Quilts From the Cabin Ep3 Quilting Podcast | Hard Candy Christmas Edition

Welcome back to Quilts from the Cabin. I’ve been waiting all year to write this one.
As I’m typing, the cabin is finally dressed for the holidays—twinkle lights in the windows, quilts draped over every chair, and more red and white patchwork than seems reasonable for one tiny house in the woods. I finished most of the decorating last night, and even though I ran out of steam before I could fuss over every corner, it already feels like Christmas in here.
This post is the companion to my Christmas episode on YouTube, where I walk through all of these makes on camera. If you’re a visual learner, you can watch the full episode there and then come back here for links, notes, and all the little details I forgot to say out loud.
Let’s talk about this year’s Christmas collection, because she has a whole backstory.
The heart behind this collection: Hard Candy Christmas
This entire collection is my love letter to old-school Christmas—the 80s and 90s kind with handmade decorations, traditional colors, and that slightly nostalgic, slightly kitschy magic that just feels like home.
I’m a big Dolly Parton fan, and her song “Hard Candy Christmas” has lived rent-free in my head for years. I kept thinking about those vintage bowls of hard candy ribbon and swirly red-and-white sweets that showed up every December when I was growing up. That memory became the starting point for this whole group of designs.
Color-wise, I kept things extremely simple: one perfect red and one soft white. The red is Scarlet from Northcott ColorWorks, and the white is Snow from the same line. In real life, Scarlet is a deeper, richer red than it appears on camera—just classic, cozy Christmas. I’m actually using this red as a feature color in a new collection I have planned for 2026, so you’ll be seeing more of it.
All of the Christmas makes I’m sharing here use that same Scarlet + Snow palette, which keeps everything feeling cohesive and timeless.
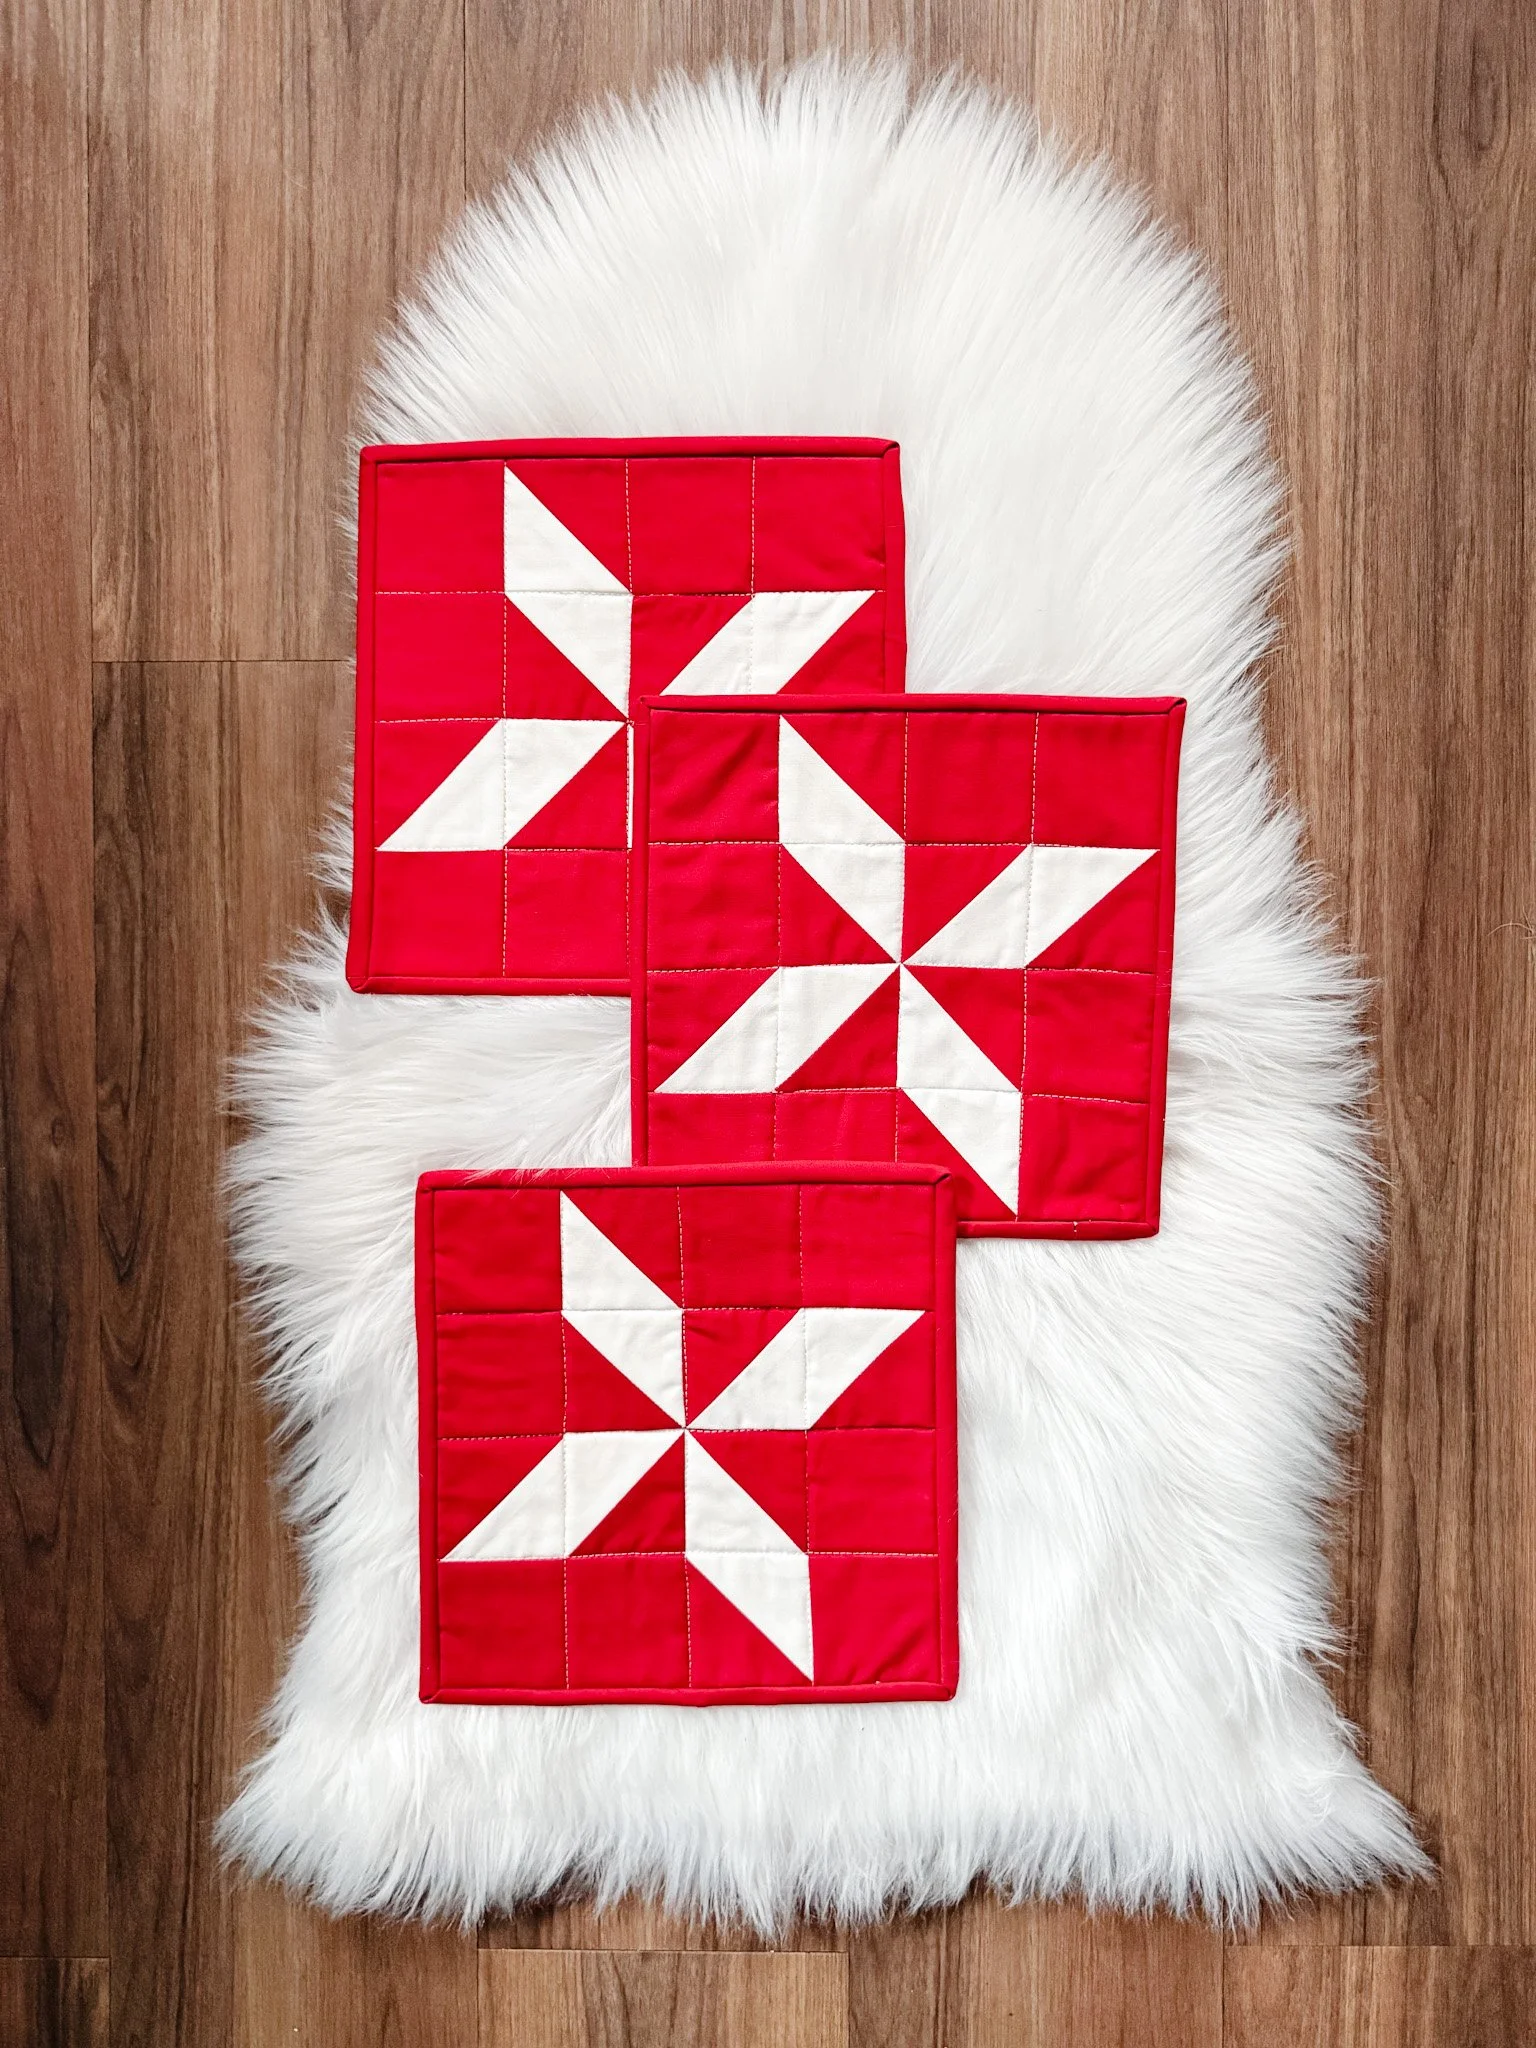
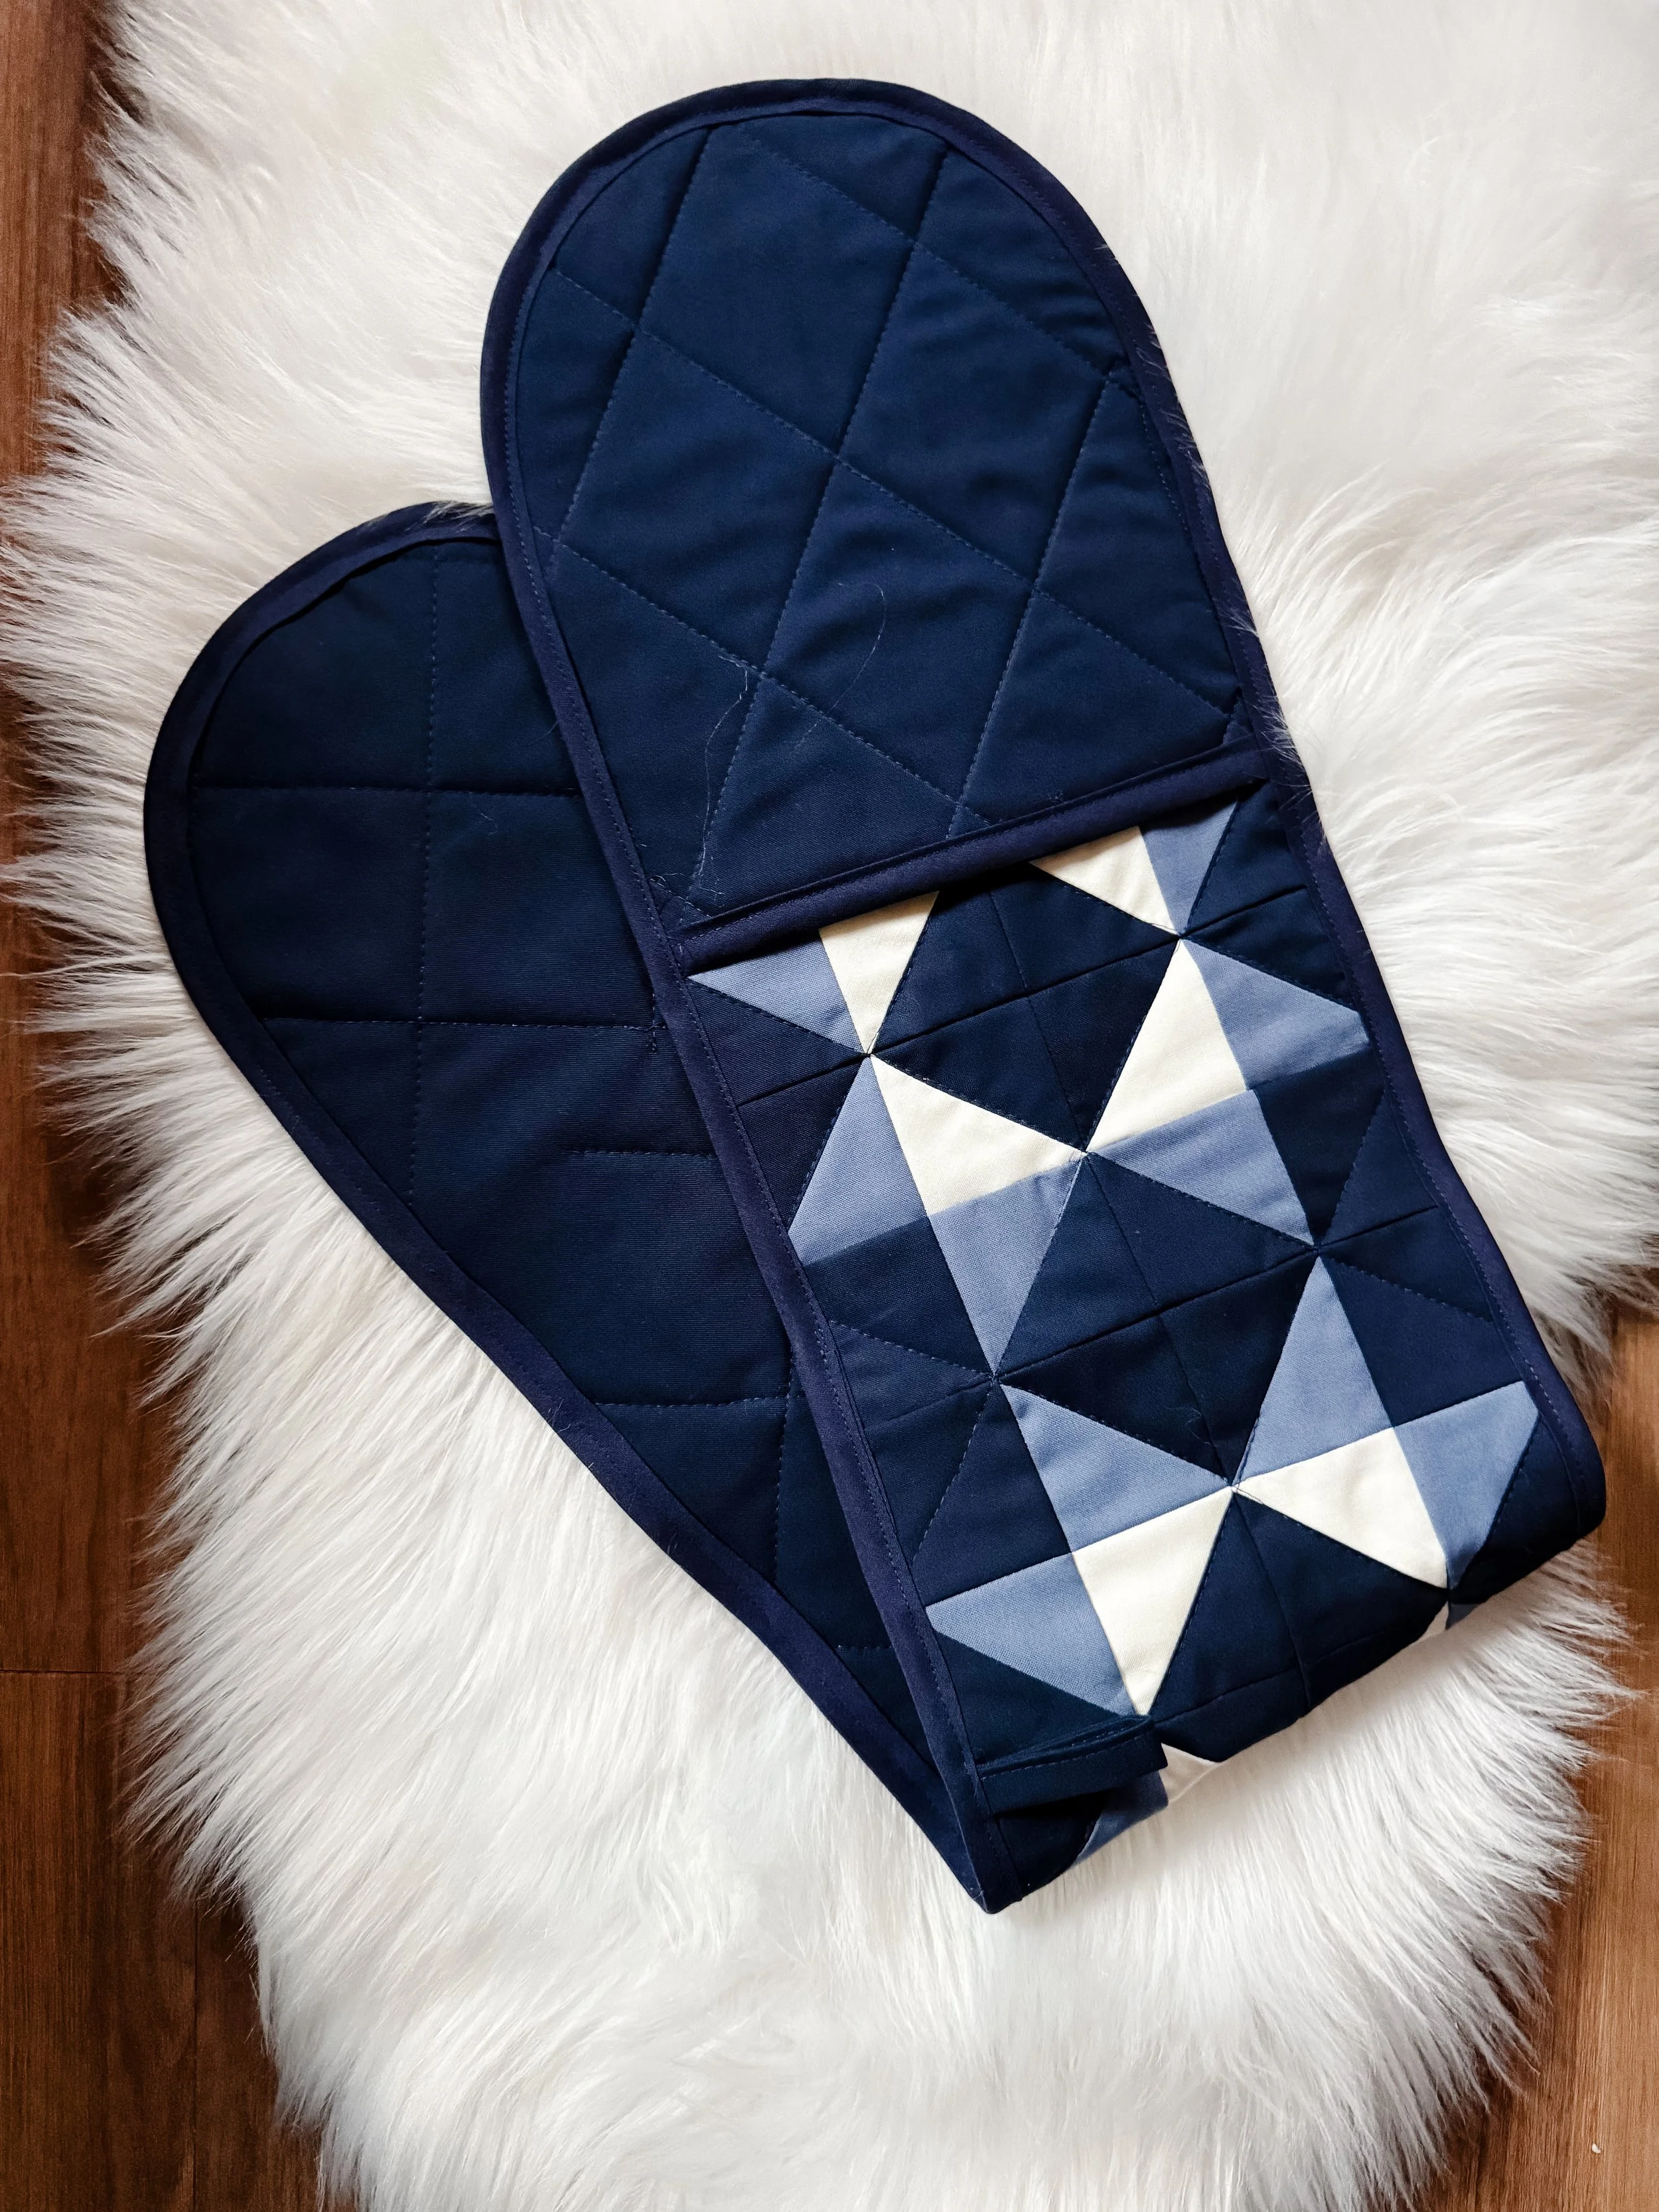
The first pattern in the collection is my Poinsettia Potholders.
Technically, the block is a pinwheel, but every time I look at it from above, it reads like a poinsettia—the petals radiating out in that classic Christmas way. It’s simple, graphic, and so satisfying to sew.
In the pattern, I include:
step-by-step diagrams for the HSTs
trimming instructions
a block layout diagram so you can “see” the construction without needing to read every word
I’m a very visual person, so having diagrams is non-negotiable for me. You’ll see them in all my patterns for that exact reason.
You can make:
one potholder, or
a set of three
and I’ve included yardage for both options. I love the idea of stitching a little stack and tying them with ribbon as a gift, or tucking a single one into a stocking with a favorite wooden spoon.
I machine quilted these (just in the ditch) because I was on a tight timeline, but they’d also be beautiful with big-stitch hand quilting if you want to lean into the handmade vibe even more.
(Part of the Hard Candy Christmas Pattern Collection)
Some Christmas memories feel stitched right into us—the ones with red felt stockings, cinnamon simmering on the stove, and the kind of old holiday specials that played in the background while everyone wrapped gifts on the living-room floor. That’s where this Poinsettia Potholder pattern comes from. I wanted something simple and classic, the kind of red-and-white star block that feels like it’s been in the family forever—even if you just made it last night with a cup of cocoa nearby.
The Poinsettia Potholder is part of the Hard Candy Christmas Collection, inspired by those cozy, slightly-faded Christmas seasons from the ’80s and ’90s—bright candies in glass dishes, handmade ornaments, and that soft, warm glow everything seemed to have back then. Whether you’re whipping up a single potholder for your own kitchen or sewing a trio for gifting, this little block brings all that vintage joy back into the room.
This pattern makes a sweet, quick holiday project—traditional, scrappy, giftable, and full of charm.
Make 1 or Make 3 – your choice!
Skill Level
Confident Beginner
This pattern assumes you have basic quilting knowledge. For a tutorial on how to quilt, watch this tutorial here: https://youtu.be/qrqtRgq5ODY
What’s Included (and why you’ll love it)
• Step-by-step instructions for making one or three 10" × 10" quilted potholders
• Clear cutting charts for both quantities
• Easy 8-at-a-time HST method
• Simple block layout for that classic poinsettia star
• Quilting and finishing instructions for clean, tidy edges
• Optional hanging-loop instructions
• Printer-friendly PDF with a clean, minimal layout
• 100% original pattern
• Instant downloadable PDF
Make One or Make Three
Choose your quantity based on your project:
• One potholder – perfect for sampling the block or making a quick handmade gift
• Three potholders – ideal for gifting sets, decorating your holiday kitchen, or stocking your booth
Both cutting charts and instructions are included.
All sales are final. If you have questions before purchasing, please reach out—I want you to feel confident in your purchase.
Thank you so much for supporting my work. It means the world to me that something I designed might find its way into your everyday life.
With warmth,
Kim
Tag your finish with #EXSHAWQUILTS and @exshaw so I can cheer you on.
This pattern is intended for personal use only.
Some designs stitch themselves straight out of memory, and this one feels like that. Part of my Hard Candy Christmas Pattern Collection, Ribbon Candy is my love letter to those vintage holiday moments: the red-and-white candies in glass bowls, the crackle of VHS tapes playing in the background, and that sweet mix of nostalgia and comfort we all reach for this time of year. I wanted a table runner that carried that same feeling—simple, festive, and a little sentimental.
This runner is bold and classic, made entirely from tidy half-square triangles that twist and turn like the striped candies we grew up sneaking from Grandma’s dish. Clean, modern lines meet vintage holiday charm, making this piece beautiful for everyday December decorating or a handmade heirloom gift.
Skill Level
Confident Beginner
This pattern assumes you have basic quilting knowledge. For a tutorial on how to quilt, watch this tutorial here: https://youtu.be/qrqtRgq5ODY
What’s Included (and why you’ll love it)
• Step-by-step instructions for making a finished 14″ × 44″ table runner
• Clear cutting charts and 8-at-a-time HST instructions
• Block layout guidance for the ribbon-twist motif
• Quilting and finishing instructions for tidy, polished results
• Binding instructions for a clean professional edge
• Printer-friendly PDF with a clean, minimal layout
• 100% original pattern
• Downloadable PDF (yours to keep forever)
Design Features
• A striking ribbon-twist motif
• Clean border framing for a crisp, candy-stripe look
• Works beautifully in solids, hand-dyed fabrics, or scrappy red-and-white pulls
• Simple construction that yields a stunning holiday statement piece
Construction & Techniques
• ¼″ seam allowance throughout
• 8-at-a-time HST method for fast, accurate block building
• Straightforward block assembly with trimming notes for perfect points
• Classic quilt construction: piecing, pressing, adding borders, quilting, and binding
• Designed for a flat, polished finish even for newer quilters
Materials & Specs
Finished Size: 14″ × 44″
All Exshaw Quilts patterns assume 42″ usable WOF and ¼″ seam allowance
Fabric Requirements:
• Red (main color): ⅚ yard
• White/Background: ½ yard
• Binding: ⅓ yard
• Backing: 1½ yards
• Batting: 1⅓ yards
This little runner stitches up with such a comforting rhythm—chain-piecing HSTs, pressing warm seams, watching the candy-twist pattern appear row by row. It’s the kind of make that invites a cozy movie, twinkle lights, and a mug of something warm. I hope it brings the same easy joy to your holiday season.
All sales are final. If you have questions before purchasing, please reach out—I want you to feel confident in your purchase.
Thank you so much for supporting my work. It means the world to me that something I designed might find its way into your home during the holidays.
With warmth,
Kim
Tag your finish with #EXSHAWQUILTS and @exshaw so I can cheer you on.
This pattern is intended for personal use only.
Ribbon Candy Table Runner Quilt Pattern
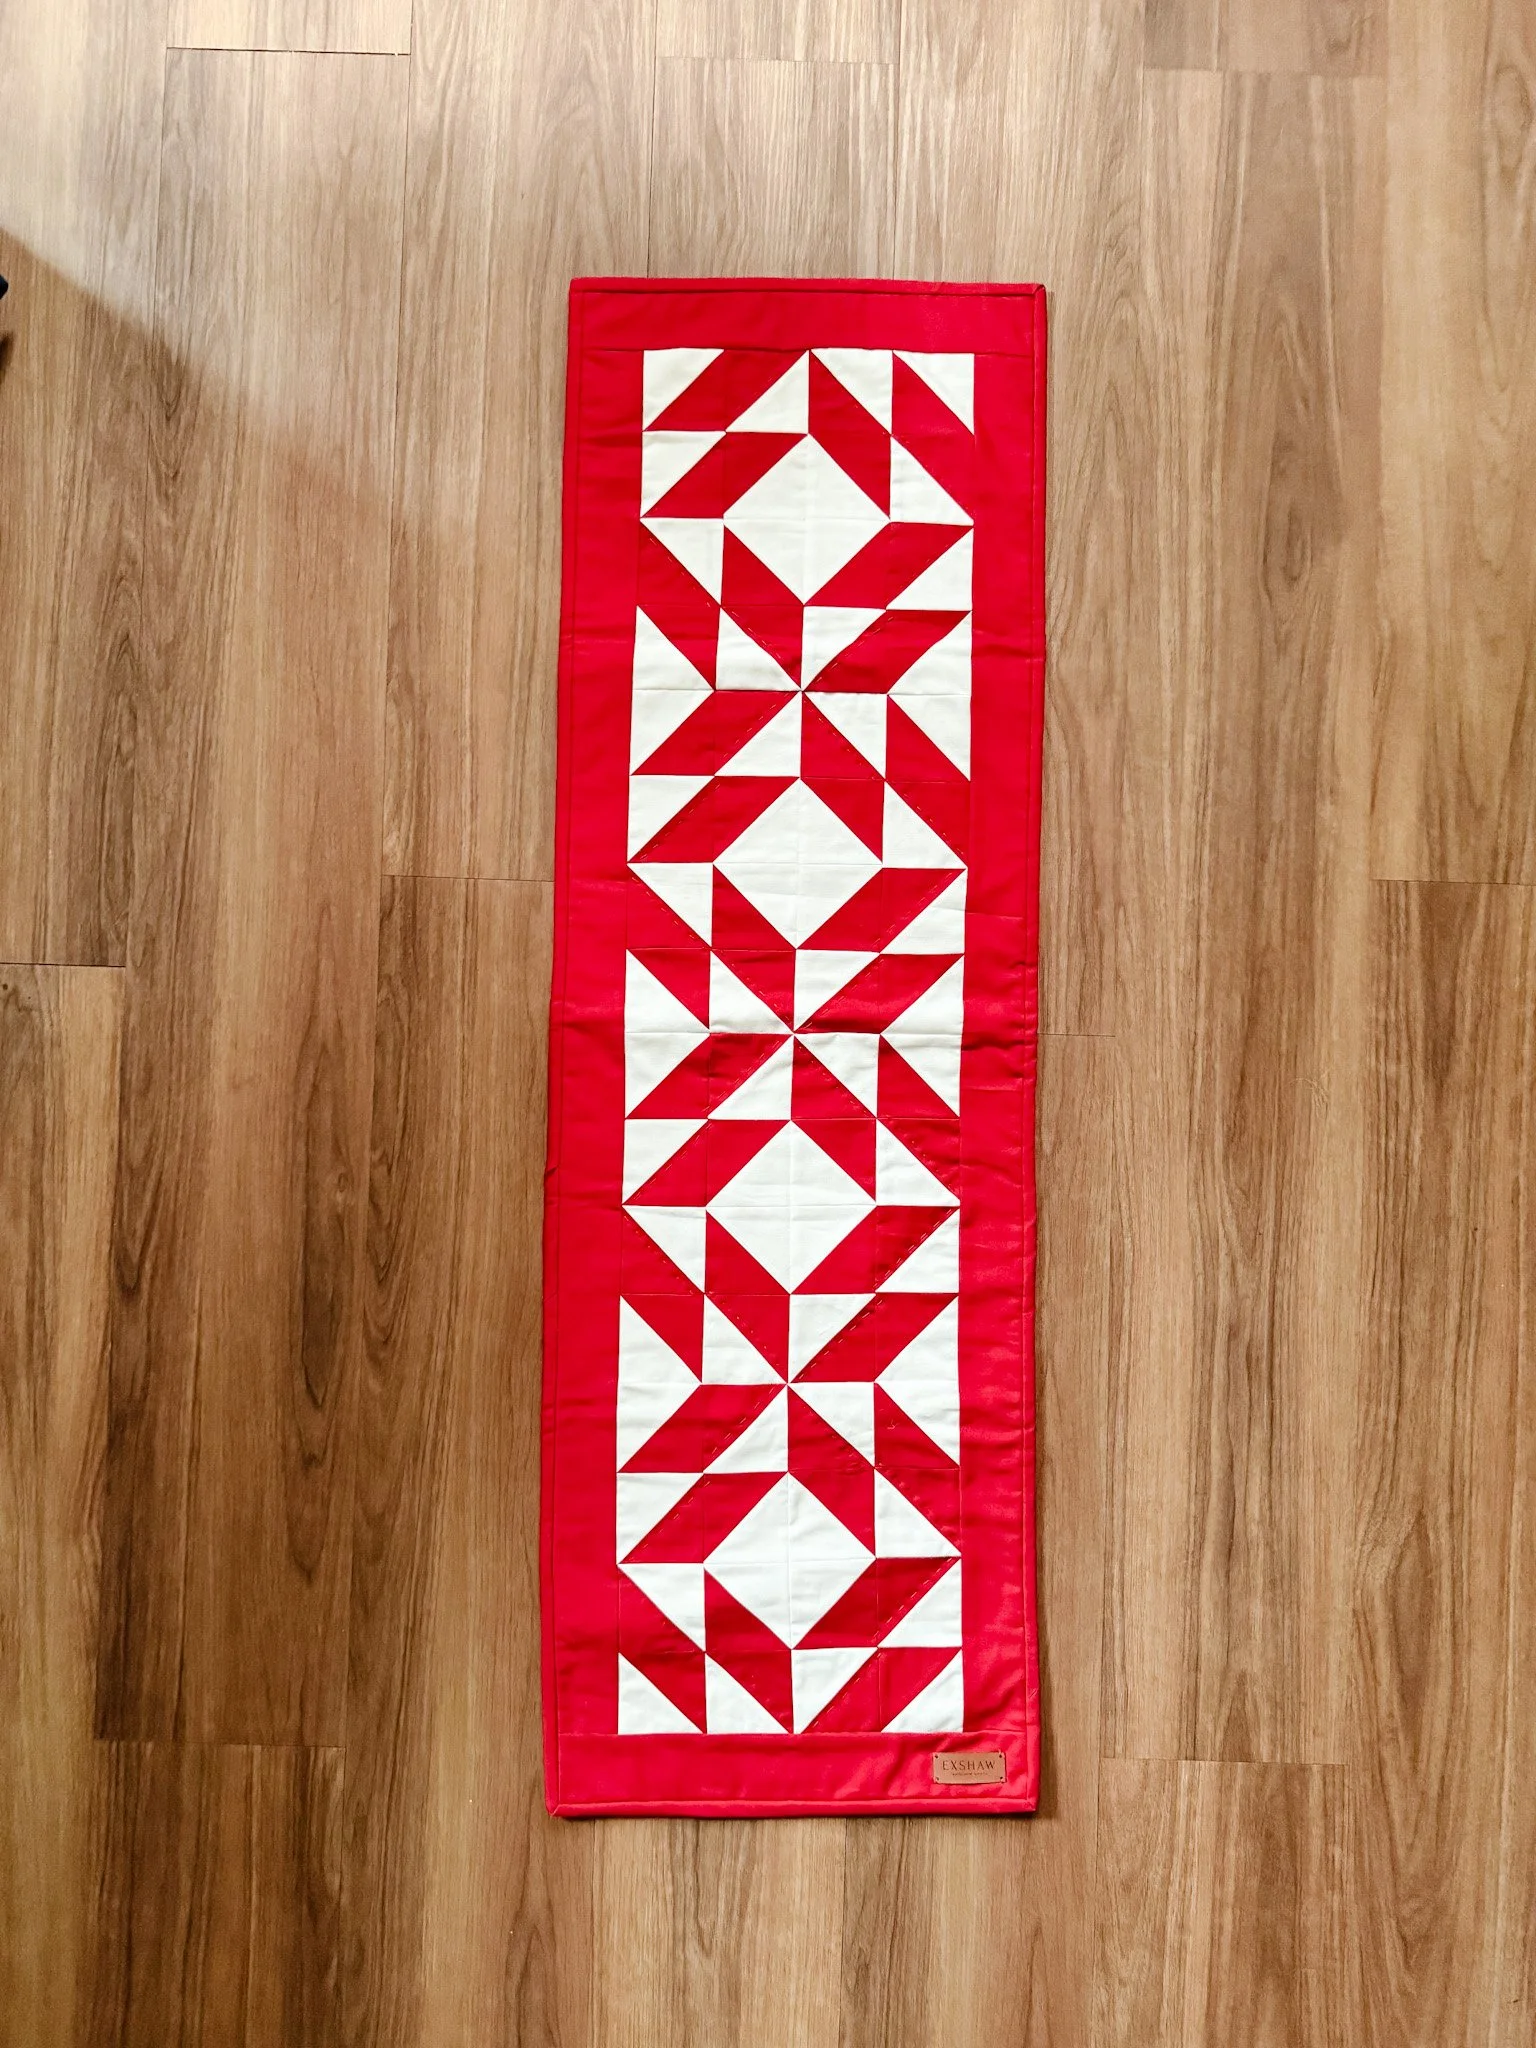
If I had to pick a favorite from this collection, the table runner might be it.
This design uses a block that feels like that ribbon candy we used to have on the buffet at Christmas when I was a kid. The runner is made up of those blocks plus a border and binding, all in that same Scarlet and Snow palette.
I hand quilted this one (of course), and it was such a joy to stitch. Table runners are the perfect size for hand quilting—small enough to maneuver easily, big enough to feel meditative and satisfying. I love queuing up a podcast and just stitching my way around the design.
My plan is to lay this runner down the center of the cabin table at Christmas, pile appetizers and treats on top, and let it be the quiet backdrop under all the holiday chaos.
There’s a certain kind of Christmas nostalgia that sneaks up on you—the soft glow of tree lights, the clink of hard candy in a glass dish, and the feeling of being tucked safely inside while the world turns quiet outside your window. This little Ornament Trio is part of my Hard Candy Christmas Collection, stitched straight from those memories. Each block feels like its own tiny moment: playful, sweet, and made to bring a little handmade warmth to your holiday season.
These 3 ornament designs are simple, charming, and deeply giftable—quick makes you can sew in an evening, hang on your tree, tie onto presents, or tuck into stockings. Whether you keep them traditional or go scrappy, they carry that cozy, old-movie kind of Christmas magic.
Skill Level
Beginner
This pattern assumes you have basic quilting knowledge. For a tutorial on how to quilt, watch this tutorial here: https://youtu.be/qrqtRgq5ODY
What’s Included (and why you’ll love it)
• Step-by-step instructions for making three finished 5″ quilted ornaments
• Clear cutting charts for all three block designs
• Easy HST methods (8-at-a-time + 4-at-a-time)
• Block layout diagrams for Pinwheel, Sawtooth, and Bowtie motifs
• Finishing instructions for turning, stuffing, and adding a hanging loop
• Printer-friendly PDF with a clean, minimal layout
• 100% original pattern
• Downloadable PDF
Design Features
• Three classic mini quilt blocks: Pinwheel, Sawtooth, and Bowtie
• Fully stuffed for a soft, pillowy ornament look
• Simple hanging loop included in the construction
• Backed with a single fabric square for a tidy finish
• Works beautifully in solids, scraps, or hand-dyed fabrics
• Perfect for gift tags, stocking stuffers, garlands, and tree décor
Construction & Techniques
• ¼″ seam allowance throughout
• 8-at-a-time and 4-at-a-time HST construction
• Straightforward layout and piecing
• Turning and stuffing method for the finished ornament
• Loop installation included in the seam for a polished look
• No quilting required (these are soft ornaments, not quilted pieces)
Materials & Specs
Finished Size: Each ornament measures 5″ finished before turning and stuffing
All Exshaw Quilts patterns assume 42″ usable WOF and ¼″ seam allowance
Materials Needed:
• Small cuts of two contrasting fabrics (¼ yard of each is plenty)
• Backing: ¼ yard or scraps
• Fiber fill, batting scraps, or leftover trimmings
• Ribbon or baler’s twine for hanging loops
• Basic sewing tools
Sometimes the smallest projects are the ones that slow you down in the best way. These tiny blocks are quick, sweet, and meditative to sew—little pauses in the season where your hands get to do something comforting and familiar.
All sales are final. If you have questions before purchasing, please reach out—I want you to feel confident in your purchase.
Thank you so much for supporting my work. It means the world to me that something I designed might become part of your holiday traditions.
With warmth,
Kim
Tag your finish with #EXSHAWQUILTS and @exshaw so I can cheer you on.
This pattern is intended for personal use only.
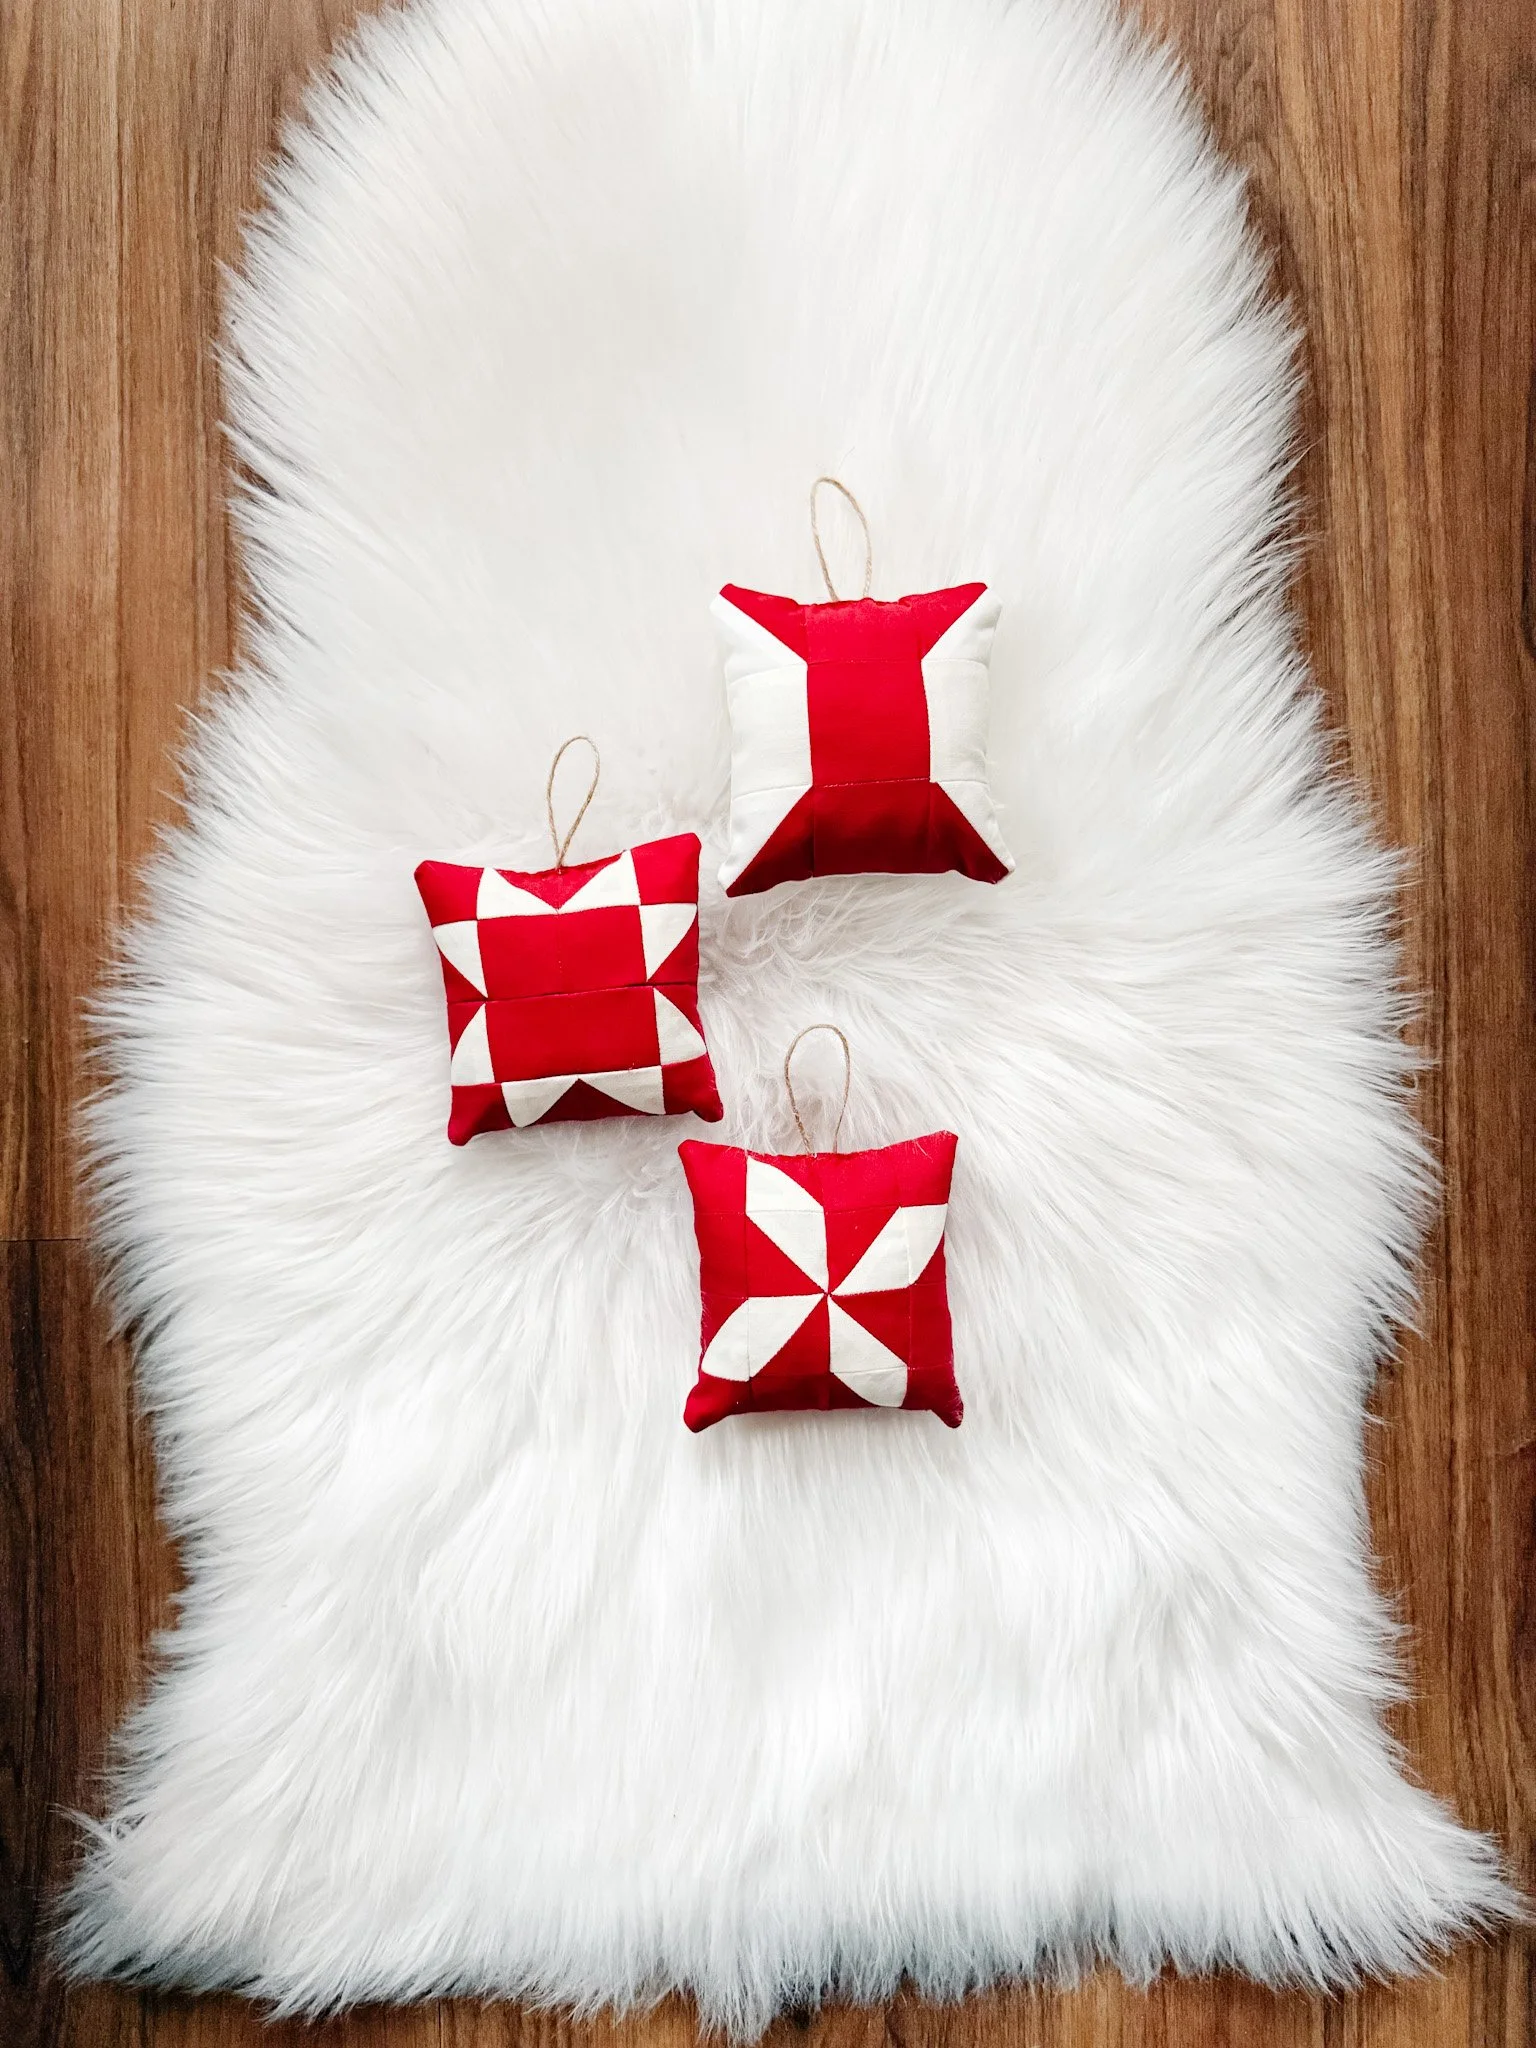
Tiny quilted tree ornaments
Next up: the ornaments.
I’ve designed three different mini ornament blocks:
a tiny poinsettia to match the potholders
a little sawtooth star
a sweet bow tie block
They’re scrappy, small, and very addictive. These are perfect for raiding your stash—reds, creams, even other color palettes if you want to break away from traditional Christmas.
I stitched mine up, stuffed them using the filling from an inexpensive pillow (my favorite budget-friendly stuffing hack), and used simple twine for hanging loops. They look so sweet on the tree, but I can also see them tied onto gifts, hung on cabinet knobs, or strung as a little garland.
This ornament pattern is now in the shop and ready for your Holiday making time.
(Part of the Hard Candy Christmas Pattern Collection)
There’s just something about an old Dolly Parton Christmas movie—the soft glow, the heartfelt humour, the warm-and-cozy charm—that settles right into your bones. Peppermint Swirls was born from that feeling. This whole Hard Candy Christmas Collection is my love letter to those vintage holiday moments: the red-and-white candies in glass bowls, the crackle of VHS tapes, and that sweet mix of nostalgia and comfort we all reach for this time of year.
This placemat is simple, bold, and delightfully classic—an 80’s-era peppermint twist reimagined in clean, modern patchwork. Dress up your holiday table, gift a handmade set, or stitch a stack for those cozy December breakfasts.
Make 1 or Make 4 – your choice!
Skill Level
Beginner
This pattern assumes you have basic quilting knowledge. For a tutorial on how to quilt, watch this tutorial here: https://youtu.be/qrqtRgq5ODY
What’s Included (and why you’ll love it)
• Step-by-step instructions for making a finished 12" × 18" quilted placemat
• Clear cutting charts and HST methods (4-at-a-time + 8-at-a-time)
• Block layout guidance for the peppermint motif
• Quilting and finishing instructions for tidy, beginner-friendly results
• Binding installation steps for a polished, professional look
• Printer-friendly PDF with a clean, minimal layout
• 100% original pattern
• Downloadable PDF
Design Features
• Classic peppermint star motif created with simple, crisp half-square triangles
• Clean borders and neat binding for a timeless finish
• Easy-to-quilt layout that works beautifully with straight-line or hand quilting
• Looks amazing in solids, hand-dyed fabrics, or a scrappy red-and-white pull from your stash
Construction & Techniques
• ¼" seam allowance throughout
• 4-at-a-Time and 8-at-a-Time HST methods for fast, accurate piecing
• Simple block assembly with clear trimming guidance
• Quilt-top finishing, squaring, and binding included
Materials & Specs
Finished Size: 12" × 18"
All Exshaw Quilts patterns assume 42″ usable WOF and ¼″ seam allowance
Sometimes the simplest makes are the ones that carry the most heart. Peppermint Swirls is meditative, rhythmic, and joyful—just enough piecing to ease you into the season, and just enough nostalgia to make it feel like home.
All sales are final. If you have questions before purchasing, please reach out—I want you to feel confident in your purchase.
Thank you so much for supporting my work. It means the world to me that something I designed might find its way into your everyday life.
With warmth,
Kim
Tag your finish with #EXSHAWQUILTS and @exshaw so I can cheer you on.
This pattern is intended for personal use only.
Peppermint Swirl Placemat Quilt Pattern
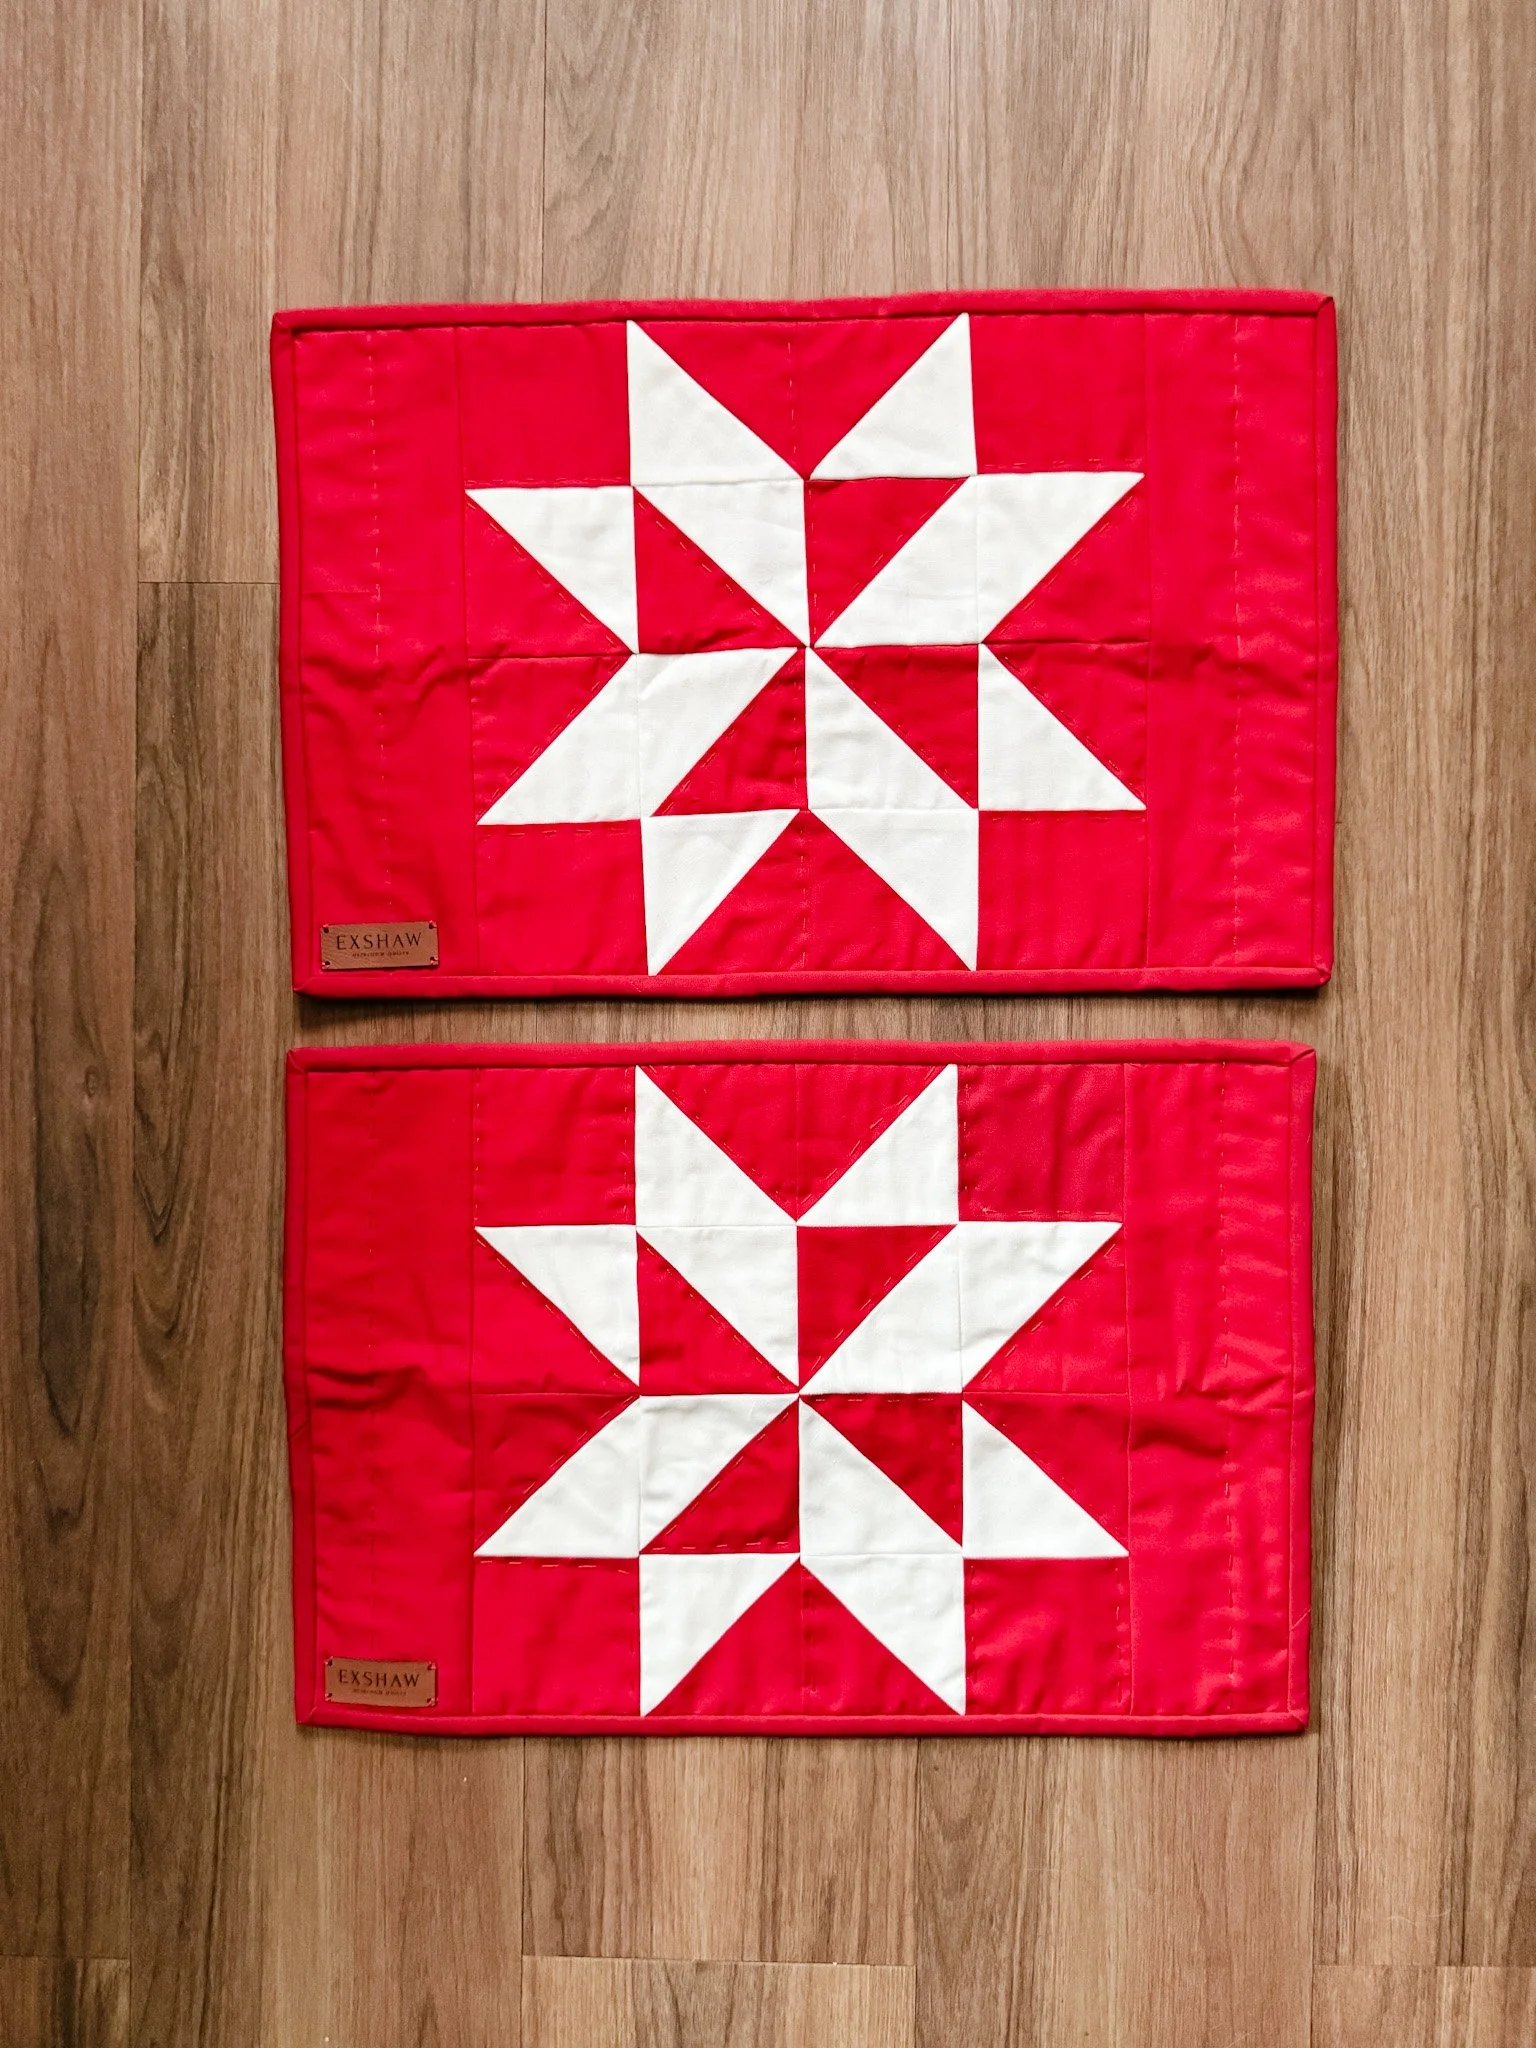
To round out the table, I made a set of placemats that coordinate with the runner.
The design has a sawtooth-style frame with a candy swirl motif in the center. When you set a plate down, it looks like the plate is sitting on a star—it’s such a simple little detail, but it makes the whole place setting feel special.
In the pattern, you’ll find:
instructions for making one placemat, or a set of four
yardage charts for both options
cutting charts and clear piecing diagrams
I hand quilted these as well in red pearl cotton, and I absolutely loved how that looked against the white background. It pulled the whole palette together and gave everything that “grandma’s kitchen, but make it fresh” feeling.


The almost-finished stocking and the pattern puzzle
Now for the one that’s giving me a run for my money: the stocking.
The stocking uses the same candy-ribbon-style block from the table runner, repeated many, many times (almost a hundred units!) to create a quilted panel. I’ve already pieced and quilted the panel; the idea is to cut the stocking shape from it—similar to how I make my quilt coats from pre-quilted panels.
The challenge? I’m having a hard time getting the printed stocking template to match the proportions I want when I move it from Procreate into Canva (which is what I use to write and layout my patterns). Every other applique template I’ve done has worked fine, but for some reason this stocking wants to be difficult.
So for now, the stocking pattern is “in progress.” The panel is quilted and ready. I just need to get the scale perfect before I feel good about releasing it as a pattern. After all the time that went into those blocks, I really want to see it through.
A quick detour: the great sewing machine saga
Because nothing says “holiday sewing” like your machines all deciding to revolt.
Somewhere in the middle of this collection, I managed to drop my Juki. Those semi-industrial machines are heavy, and when it fell, the tension knob snapped. I had to special order the part from the States (I’m up in rural northern BC), so that put the Juki temporarily out of commission.
No big deal, I thought, I’ll use my backup semi-industrial Brother (an older straight-stitch model). Except that machine is from the 70s/80s and the same part has worn out on it too. Then the bobbin winder broke. So that was machine number two off the table.
Thankfully, I still had my Brother CS7000X, which I usually reserve for applique. That little workhorse stepped up and carried me through. Between that and eventually investing in a new Juki (so the old one can retire into backup duty), I was able to finish the collection. But it was definitely a week.
A mini “how to quilt” placemat tutorial
As part of this collection, I filmed a tutorial on how to make the Christmas placemat—and really, it doubles as a mini “how to quilt” workshop.
In it, I walk through:
piecing
basting
quilting (including hand quilting)
If you watch it and feel like I’ve missed a step or zoomed past something you need more help with, that’s where my full Quilt Workshop comes in. The workshop covers everything in much more detail, with hours of content and lifetime access. I include both hand and machine options for piecing and quilting, so you can choose what fits your style and your space.
Applique, natural dye, and “Hold Your Horses”
I also promised in a previous episode that I’d share some applique projects, and then I promptly forgot to show them on camera—so we’re correcting that here.
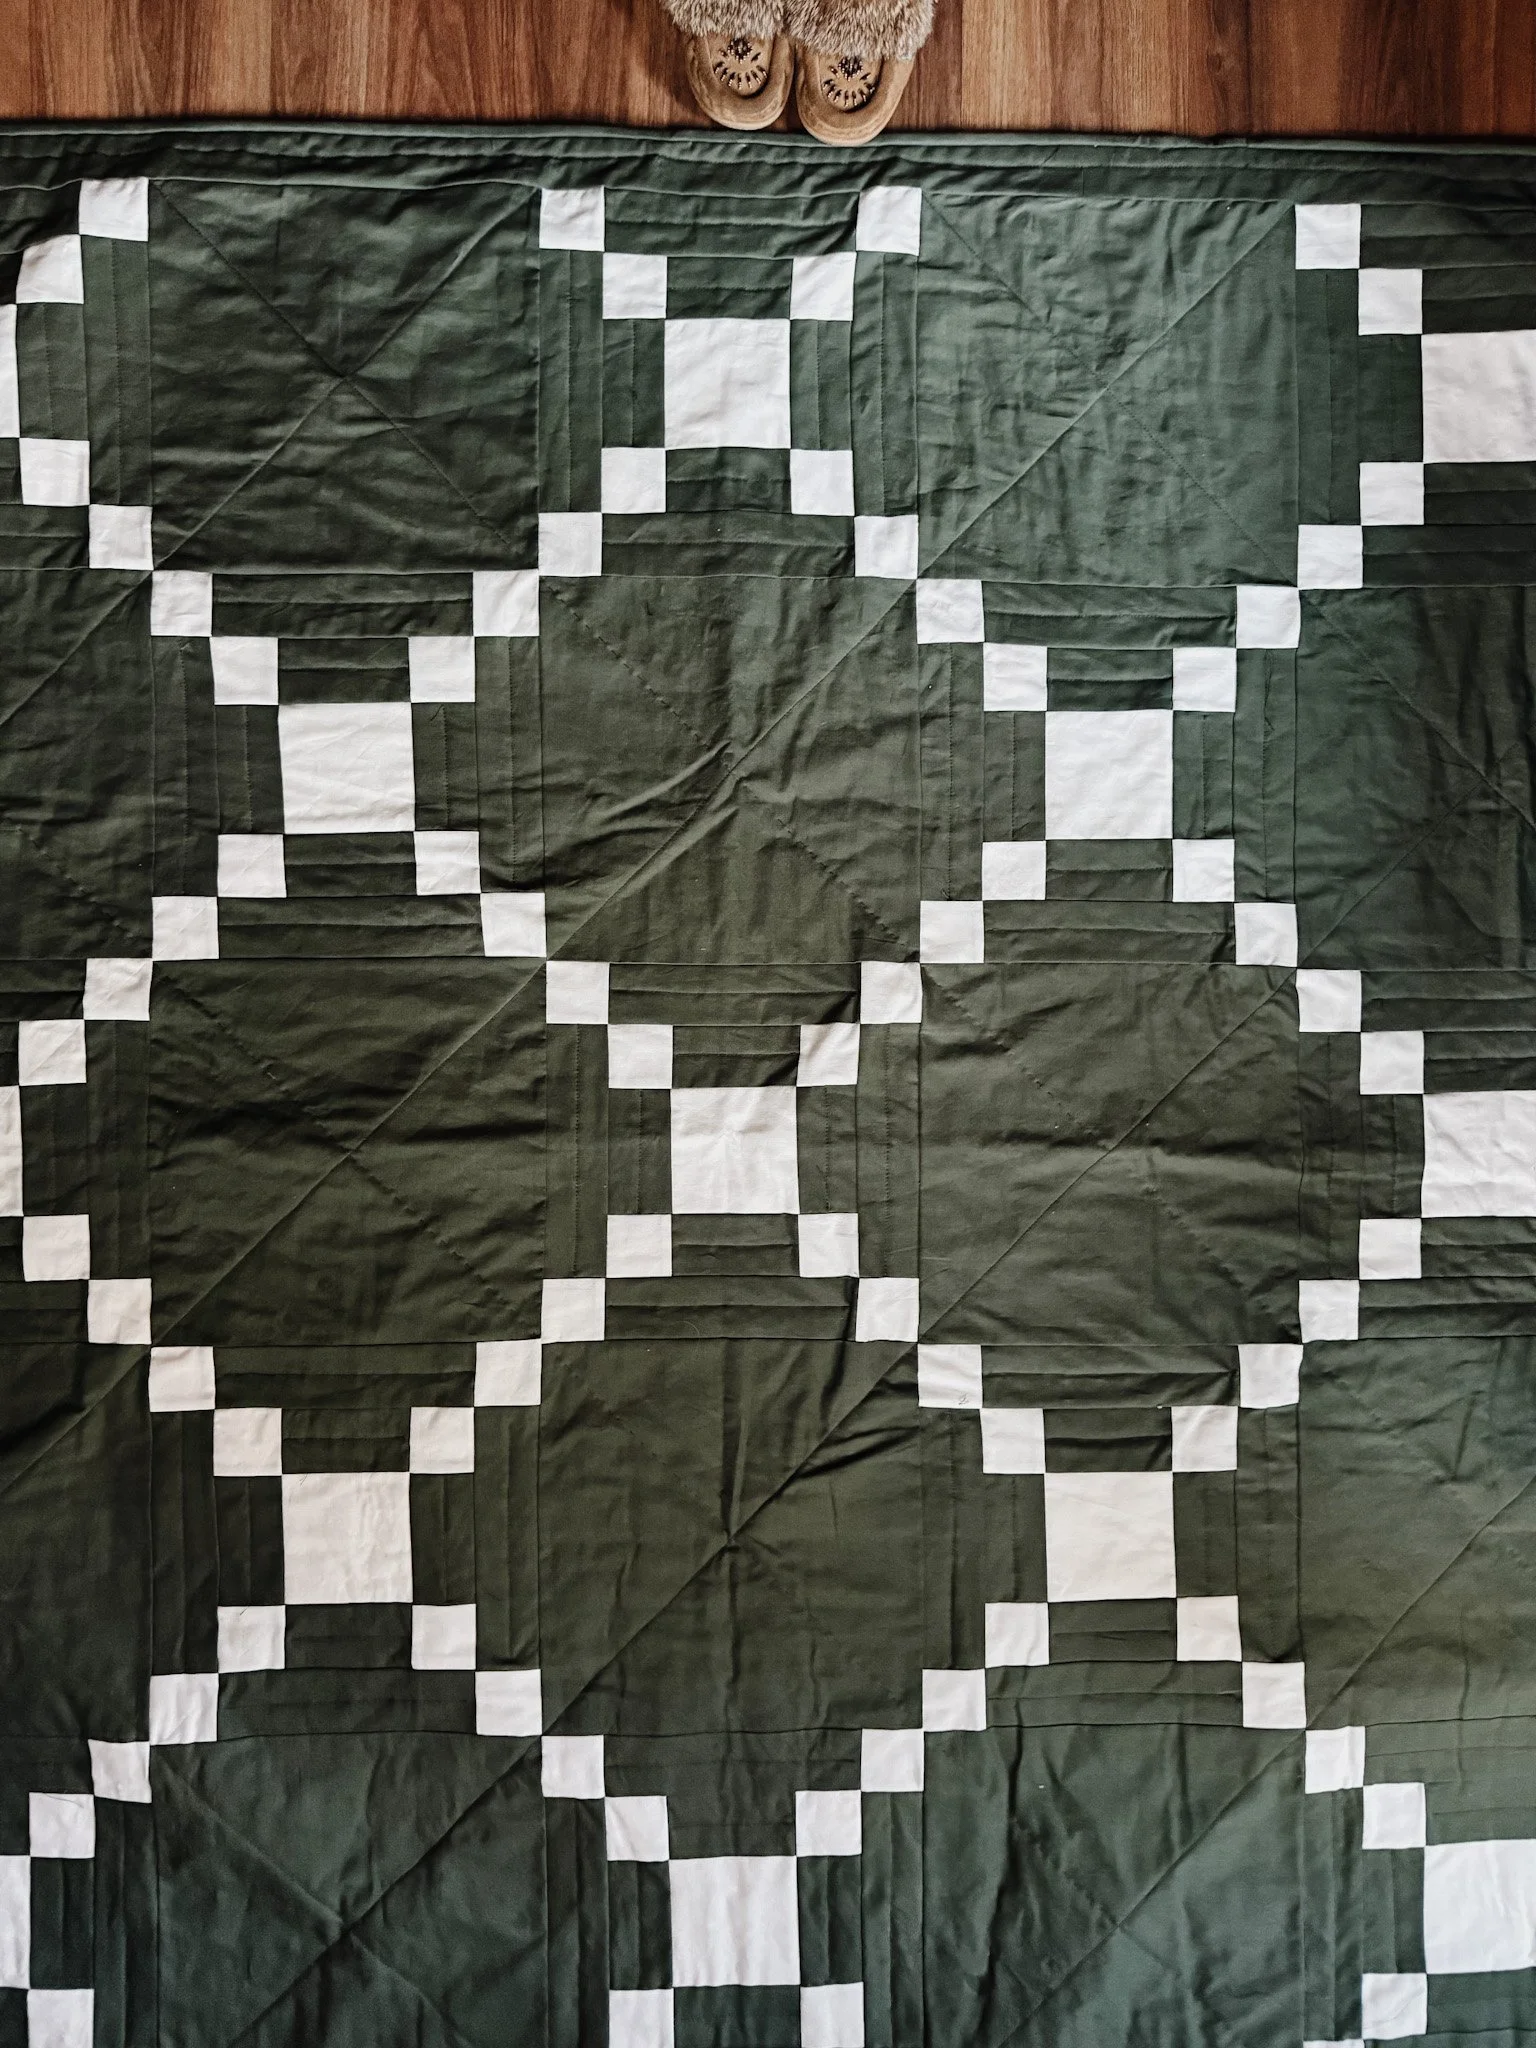
First up: my “Hold Your Horses” quilt.This one is a throw-size quilt that I’m building like a big poster. The words “hold your horses” are appliqued across the center in a beautiful green, and I’m planning to frame the whole thing with a white inner border and a dark brown outer border so it feels like a framed print you could hang—or just drape over the back of the couch.
It’s a little bit cheeky, a little bit folksy, and very “me.” Once I have my machine situation fully sorted and the last borders on, I’ll share more about this one, including whether it wants to be a pattern.
Folk-art tulip wall hangingAnother applique piece people have asked about is a folk-art floral wall hanging.
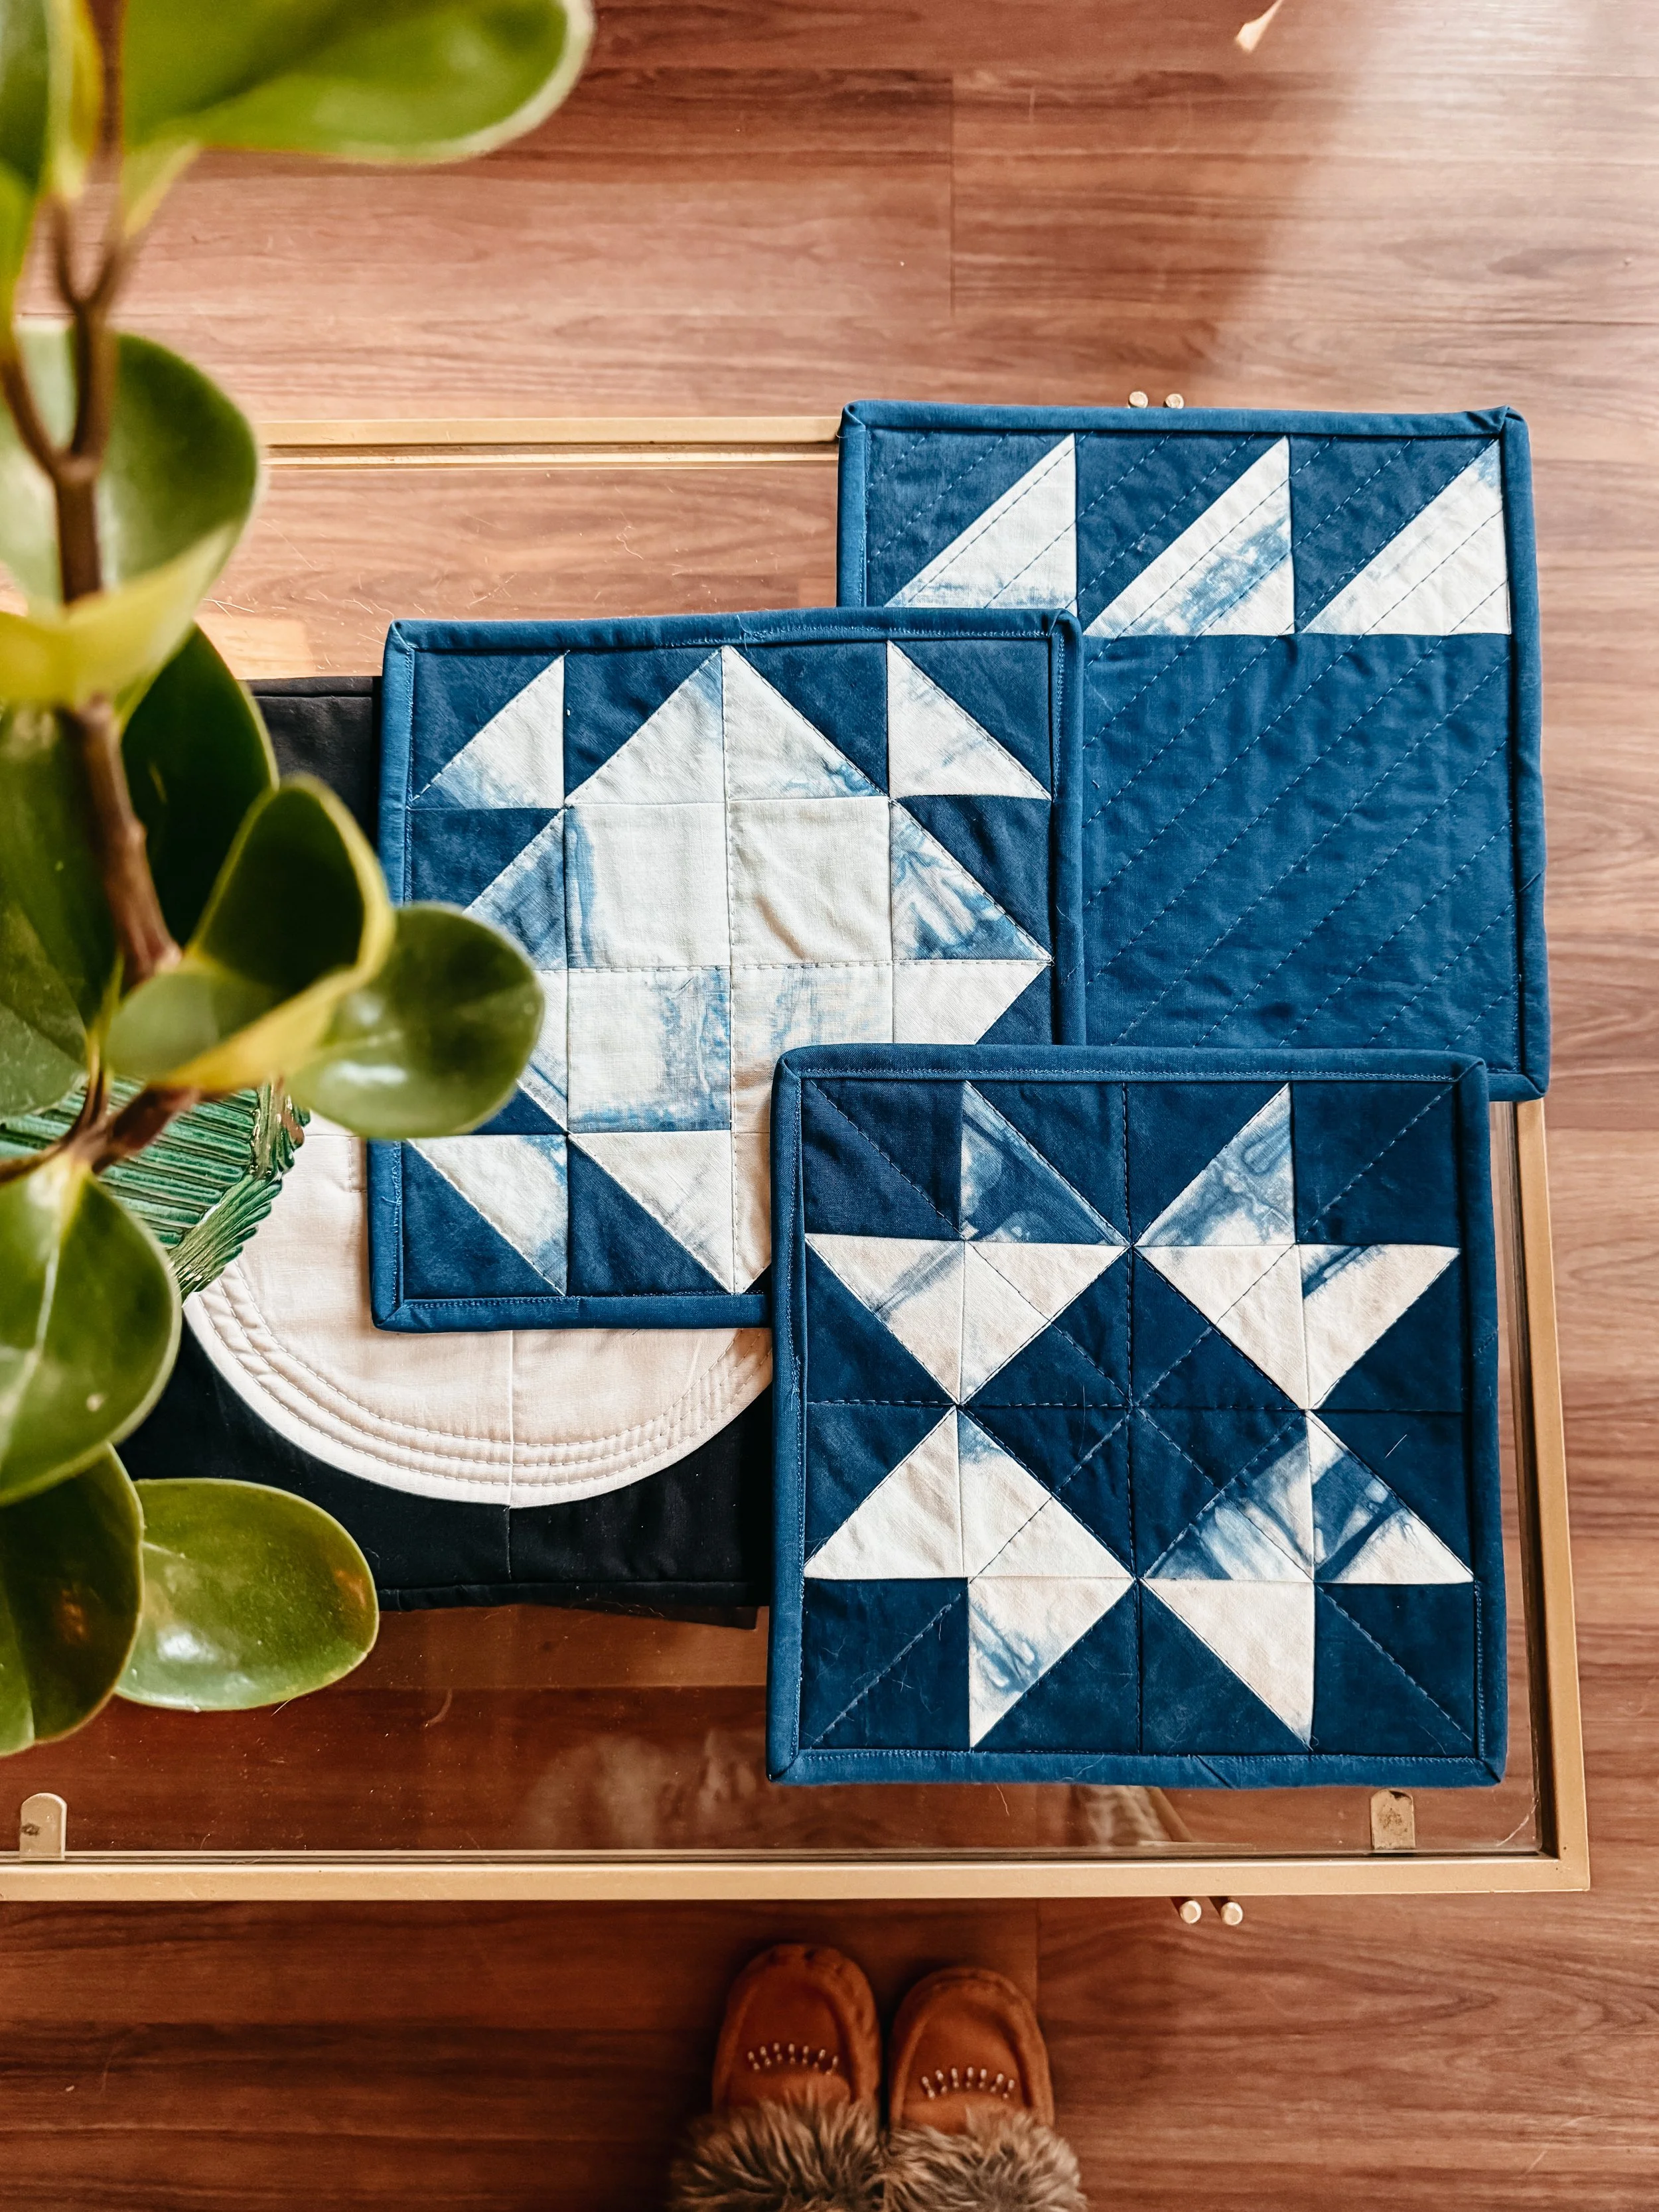
It’s made entirely from my own indigo-dyed fabrics:
deep navy
medium, exhausted-vat blues
and a soft sagey green I created by modifying the indigo
The motif is a stylized tulip inspired by traditional Scandinavian folk art (my grandparents are from Norway, so this kind of imagery feels very close to home for me).
There’s already a raw-edge applique tutorial on my channel where you can see the technique I use. The pattern for this specific wall hanging is on my “to-finish” list—I’ve written the bones of it and just need to finalize layout and photos before it lands in the shop.
Applique kerchiefs (hand-dyed and folk-y)Over the summer, I also stitched up some applique kerchiefs using my hand-dyed fabrics.
One version has a rich brown base with appliqued shapes in modified indigo greens and pinks. The colors were all created with natural dye—layers of indigo and modifiers to shift the shades.
These kerchiefs are simple triangles you can tie around your neck, and they were surprisingly fun to make. I did a second version on an off-white base, but in person the white reads a bit too cool and “dingy” to me, so the brown one is definitely my favorite.
In testing, I realized I’d used a fusible web that was a bit too stiff for something you wear around your neck. So in the pattern, I’ll be recommending the ultra-light fusible options instead, especially for garments and accessories. Once that’s updated and the photos are done, this kerchief pattern will join the others in the shop too.
What’s next and where to find everything
So that’s the Christmas tour from the cabin for now:
Poinsettia potholders – pattern available in the shop
Quilted tree ornaments – click here to get it
Ribbon Candy Table Runner Quilt Pattern – part of the Christmas collection
Peppermint Swirl Placemat Quilt Pattern – pattern available with options for 1 or 4
Ribbon-candy stocking – in progress, waiting on a well-behaved template
“Hold Your Horses” quilt – applique throw in the works
Folk-art tulip wall hanging – pattern on the way
Applique kerchiefs – nearly ready to share
If you want to see these pieces “in real life,” definitely pop over to the Christmas episode of Quilts from the Cabin on YouTube—that’s where you’ll get the full visual tour, plus whatever tangents I went on while filming.
And if you’re ready to sew your own version:
you can find all of my current patterns at exshawquilts.com
there’s also an Etsy shop under the same name if you prefer shopping there
my Quilt Workshop is available if you’re newer to quilting or want a more structured class-style experience
Thank you, truly, for all the kindness, comments, emails, and encouragement you’ve sent my way. This little quilting community we’re building together means the world to me. Every time I sit down to film or write, I’m thinking of you—stitching at your own tables, making your own traditions.
If you enjoyed this, feel free to subscribe to the YouTube channel, sign up for my newsletter, or share this post with a friend who loves a good Christmas project.
Your dream quilt stack isn’t as far away as it feels.
We’ll talk again soon.

Welcome to the blog—I'm so glad you're here.
I'm Kim, quilting and dyeing from an old cabin in the woods. This is where I share beginner-friendly tutorials, slow craft tips, and stories from a life stitched by hand. I hope you find something here that feels like home.